

The backing pad on my PC recently developed a disturbing `wobble.` I figured the bearings had worn out.
I looked up on the Porter Cable site and found the parts list as well as a generic instruction on how to disassemble the PC. I really didn`t want to have to send my PC out for repair and have to wait even though detailing season is almost over and I surely didn`t want to pay labor charges if it was as easy as it seemed. Of course the first step is to remove the backing plate using the flat wrench that should have come with your PC.
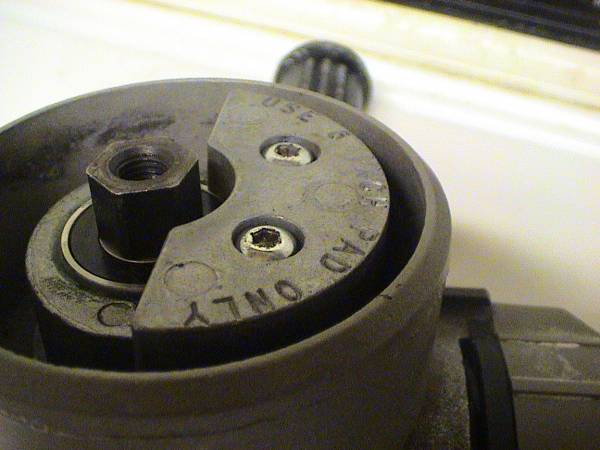
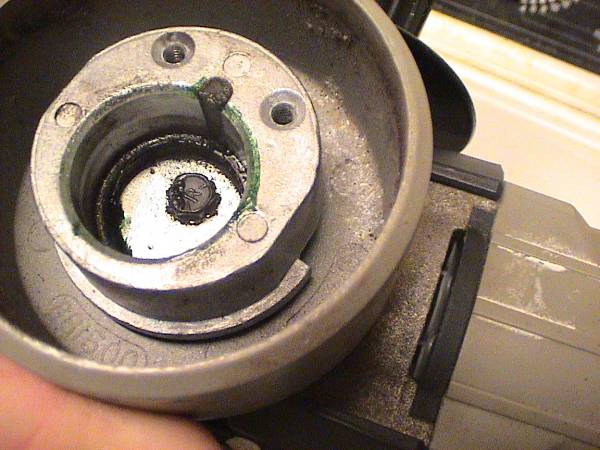
In the 2 below pictures, you can see the two torq-bit screws holding the counter weight. Sorry, but I`m not sure of the size. You can see me removing them with a bit from a cordless screwdriver. I prefer to tighten and remove the screws by hand since the PC is made of soft aluminum and it would be very easy to strip out the threads.
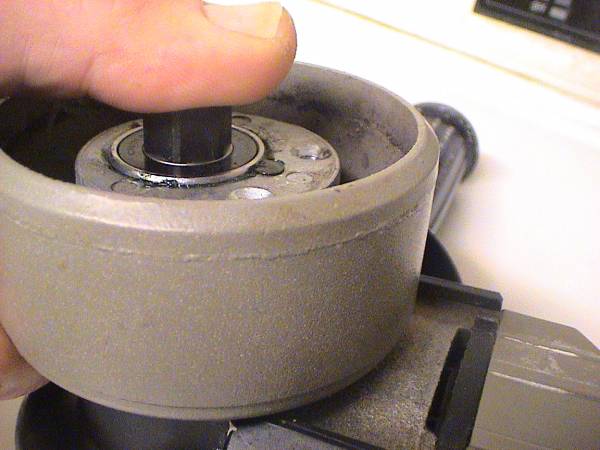
In the picture below, you can see the spindle/bearing unit is fully exposed with the removal of the weight. Now you need to reinstall the backing plate.
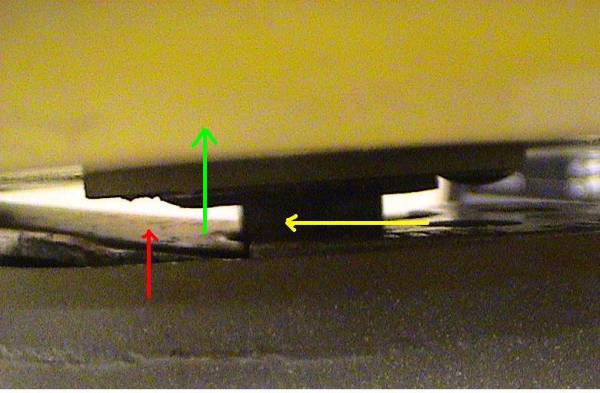
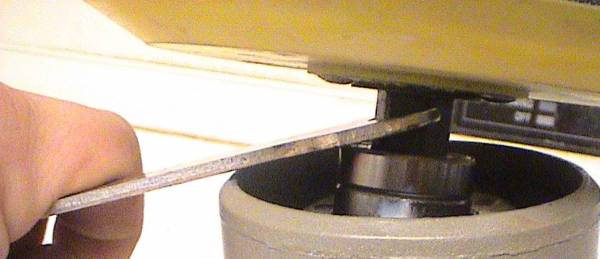
Below you can see the flat wrench is inserted between the backing plate and the buffer casing. The red arrow shows the flat wrench and the yellow is the spindle. For illustration purposes the green arrow shows how you will use the flat wrench as a lever, although in this picture the weight is still on. Not much pressure is need and the bearing assembly will slide out.
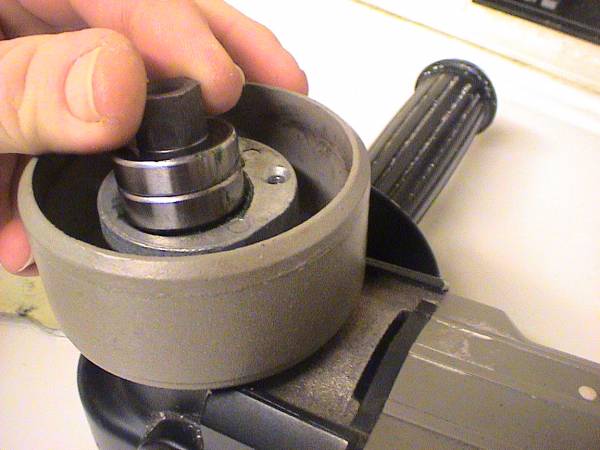
This next picture shows the socket where the bearings and spindle are housed. The screw that is visible is where you would continue disassembly. When I pulled the old bearings out, the sides had a bit of grease on them, so when I replaced the bearings, I smeared some brake caliper grease on the sides of the socket.
In this pic, I`m starting the new bearing assy into place. With the fresh grease on the walls of the socket, the new spindle & bearings popped right in almost effortlessly.
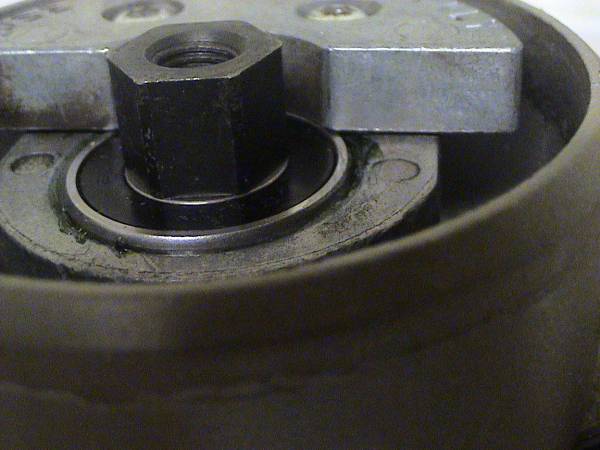
In this final pic, everything is reassembled and you can see that the bearing/spindle is held in place by the counter weight.
I found the bearing/spindle assembly by looking up the authorized repair sites and called a few until I found one that had the assembly in stock. It comes as a unit and cost just under $40.
Results 1 to 13 of 13
-
11-11-2006, 11:32 PM #1Darth Camaro 12/27/15


- Join Date
- Dec 2002
- Location
- NE Ohio
- Posts
- 2,468
- Post Thanks / Like

HOW TO: Replace bearings on PC D/A Polisher- w/pics
-
11-12-2006, 06:06 AM #2Wax on ~ Wax off

- Join Date
- Apr 2004
- Location
- Indiana
- Posts
- 251
- Post Thanks / Like
Re: HOW TO: Replace bearings - w/pics
Thanks Don for sharing this information with us! You definitely did a fantastic job documenting the repair procedure. This thread will be a very popular one indeed.
Glad you are up and about!!!
DaveExtreme Clean ~ Extreme Shine
"Do not hire a man who does your work for money, but him who does it for love of it." - Thoreau
-
11-12-2006, 07:38 AM #3New Normal

- Join Date
- Aug 2004
- Location
- Harker Heights, Tx.
- Posts
- 3,973
- Post Thanks / Like
Re: HOW TO: Replace bearings - w/pics
I agree most whole heartedly. Thank you for taking the time to give us well needed information. Originally Posted by DLR Detailing
With your information even a breaker like me could start the fixing plan in motion. Thanks alot!!
-
11-15-2006, 08:55 AM #4Long Time Member

- Join Date
- Jul 2003
- Location
- Utah
- Posts
- 10,695
- Post Thanks / Like
Re: HOW TO: Replace bearings - w/pics
Don, Did you by chance see if you could purchase the bearings on this unit from a local vendor? I`m thinking you could and actually press them on the arbor. Is the arbor hexagonal where the bearings rest? I`m thinking probably not. Do you by chance have the old bearing number?
A society willing to trade liberty for temporary security deserves neither and will lose both
ΜΟΛΩΝ ΛΑΒΕ
-
11-16-2006, 06:05 AM #5Darth Camaro 12/27/15
- Join Date
- Dec 2002
- Location
- NE Ohio
- Posts
- 2,468
- Post Thanks / Like
Re: HOW TO: Replace bearings - w/pics
I`m sure you could get the bearings individually w/o much trouble, I`ll look after work to see if there`s a number on the bearing (I`d look now, but with my contacts in, I can`t see squat close up). The arbor is round and it`s flared over the end which is how the unit is held together on the side opposite the hex piece. The thing is though that the part that is flared over is fairly thin, and when I first tried to tighten the unit up, it developed cracks Originally Posted by GearHead_1
Don M
Proud owner of a 2017
SUPERCHARGED
Hyper-Blue Metallic 2LT 6/Manual
Camaro

-
11-16-2006, 09:07 AM #6

- Join Date
- Sep 2005
- Posts
- 2,830
- Post Thanks / Like
Re: HOW TO: Replace bearings - w/pics
Don,Thank You for the step by step pics this is information that could be used for anyone who needs to replace there bearings on there PC..
-
11-16-2006, 11:10 AM #7Darth Camaro 12/27/15
- Join Date
- Dec 2002
- Location
- NE Ohio
- Posts
- 2,468
- Post Thanks / Like
Re: HOW TO: Replace bearings - w/pics
Originally Posted by GearHead_1
I looked at the bearings and they have the markings:
TAIWAN NTN 6001L8
If someone knows how to decipher those...
BTW, the easiest way to dissassemble the unit without a proper press is to use a bolt that can be threaded into the unit from the rear (the same size as the backing pad bolt) a piece of 3/4" black pipe (gas pipe) about 2" long and a vise. The hexagonal arbor fits perfectly into the gas pipe and the bolt in the back end is the ram to move the arbor out of the bearings. Very slick and easy.Don M
Proud owner of a 2017
SUPERCHARGED
Hyper-Blue Metallic 2LT 6/Manual
Camaro
-
09-23-2007, 11:26 AM #8
- Join Date
- Oct 2005
- Posts
- 2
- Post Thanks / Like
Re: HOW TO: Replace bearings - w/pics
Dear Don,
An excellent job on how to replace bearings. Do you think it will work for a Black & Decker Buffmaster? I have own the same polisher sice 1973 and I do not want to tell you how many times it went back to the factory to have the bearings replaced.
yours truly,
Brian Wilson
-
09-23-2007, 12:00 PM #9Just One More Coat

- Join Date
- Apr 2003
- Location
- Sonoma County, CA
- Posts
- 12,320
- Post Thanks / Like
Re: HOW TO: Replace bearings - w/pics
I don`t have a PC orbital but this is one great write up....also the pics are real good...Thanks
Old Enough To Know Better, Too Stupid To Care....
Dave`s Detailing
Sonoma County, CA
-
09-23-2007, 01:09 PM #10Founder Poorboy's World

- Join Date
- Apr 2003
- Location
- Boca Raton, Fl
- Posts
- 14,546
- Post Thanks / Like
Re: HOW TO: Replace bearings - w/pics
Don how often have your berrings gone bad? I`ve had my pc for about 3+ years and it seems to have no problems
 (knocking head on wood ..lol )
This should be a sticky thread for those who do encounter this problem
-
09-23-2007, 08:44 PM #11Darth Camaro 12/27/15
- Join Date
- Dec 2002
- Location
- NE Ohio
- Posts
- 2,468
- Post Thanks / Like
Re: HOW TO: Replace bearings - w/pics
Originally Posted by BHWilson

I replied to your e-mail, but I didn`t realise you had an older machine and not one of the new `throw aways.` All I can tell you is to start by carefully dissassembling the buffer starting at the backing plate.Don M
Proud owner of a 2017
SUPERCHARGED
Hyper-Blue Metallic 2LT 6/Manual
Camaro
-
09-23-2007, 08:47 PM #12Darth Camaro 12/27/15
- Join Date
- Dec 2002
- Location
- NE Ohio
- Posts
- 2,468
- Post Thanks / Like
Re: HOW TO: Replace bearings - w/pics
Once (I`ve owned mine about the same amount of time.) I should also mention my OCD extends to the function of my machines...most people would never even paid attention to the small amount of wobble mine had developed, but it drove me crazy. Originally Posted by Poorboy
Don M
Proud owner of a 2017
SUPERCHARGED
Hyper-Blue Metallic 2LT 6/Manual
Camaro
-
09-23-2007, 10:30 PM #13Founder Poorboy's World
- Join Date
- Apr 2003
- Location
- Boca Raton, Fl
- Posts
- 14,546
- Post Thanks / Like
Re: HOW TO: Replace bearings - w/pics
Originally Posted by Don
lol ..I don`t think I`d be opening mine up without already having a replacement as I do`t know that it would ever run again


 Reply With Quote
Thread Information
Users Browsing this Thread
There are currently 1 users browsing this thread. (0 members and 1 guests)
Similar Threads
-
New strut bearings for the BMW today.
By Brad B in forum Body Shop & Mechanical ModificationsReplies: 4Last Post: 09-08-2011, 04:14 PM -
looking to replace m83 with
By bookeem in forum Car DetailingReplies: 0Last Post: 07-14-2008, 01:08 PM -
PC 7336 - Needs new bearings....
By neonhomer in forum Paint Correction and Gloss EnhancementReplies: 9Last Post: 03-13-2008, 09:16 PM -
UDM to replace PC
By Thomas Dekany in forum Click & Brag -The Detailers ShowcaseReplies: 14Last Post: 01-29-2008, 06:36 PM -
Can I replace z-6 with z-8?
By imported_SHICKS in forum Car Detailing Product DiscussionReplies: 7Last Post: 08-30-2005, 06:43 AM
Bookmarks